I have movies stored on the MyBook streaming to the XBox and it works better than I could have imagined!
I was expecting stuttering (as happens when viewing films on my wireless PC connected to the telly (I suspect the USB wireless adapter on it just isn't up to the task) ) and it streams almost instantly, unlike on my laptop which seems to download the whole file before starting to play it.
Here's how.
Install ushare on the MyBook world edition. This depends upon the upnp library so get, build and install it first, then same for ushare. If anything run under sudo doesn't work then you can alternatively log in as root and run the command as root.
[gordon]$ mkdir usharebuild
[gordon]$ cd usharebuild
[gordon]$ wget http://dfn.dl.sourceforge.net/sourceforge/pupnp/libupnp-1.6.6.tar.bz2
[gordon]$ bzcat libupnp-1.6.6.tar.bz2 | tar xv
[gordon]$ cd libupnp-1.6.6
[gordon]$ ./configure
[gordon]$ make
[gordon]$ sudo make install
This will install linupnp in /usr/local/lib so we need to check this is in our libpath. Ensure the /etc/ld.so.conf file contains an entry for /usr/local/lib and run ldconfig to ensure it's added to the path.
[gordon]$ more /etc/ld.so.conf
/usr/local/lib
[gordon]$ sudo ldconfig
Now get, build and install ushare. NLS is disabled otherwise there is a dependency error on some library I don't have, possibly iconv? DLNA is disabled as it's not used for the XBox. If you have a PS3 you will need this and the dependent libraries.
[gordon]$ cd ..
[gordon]$ wget http://ushare.geexbox.org/releases/ushare-1.1a.tar.bz2
[gordon]$ bzcat ushare-1.1a.tar.bz2 | tar xv
[gordon]$ cd ushare-1.1a
[gordon]$ ./configure --disable-dlna --disable-nls
[gordon]$ make
[gordon]$ sudo make install
Simple! Technically that's it, ushare is installed and ready to run. Here's my config file after editing from the default location, /usr/local/etc/ushare.conf. Obviously you need to change your USHARE_DIR setting.
[gordon]$ more /usr/local/etc/ushare.conf
# /etc/ushare.conf
# Configuration file for uShare
# uShare UPnP Friendly Name (default is 'uShare').
USHARE_NAME="Anya uShare Media Server"
# Interface to listen to (default is eth0).
# Ex : USHARE_IFACE=eth1
USHARE_IFACE=eth0
# Port to listen to (default is random from IANA Dynamic Ports range)
# Ex : USHARE_PORT=49200
USHARE_PORT=
# Port to listen for Telnet connections
# Ex : USHARE_TELNET_PORT=1337
USHARE_TELNET_PORT=
# Directories to be shared (space or CSV list).
# Ex: USHARE_DIR=/dir1,/dir2
USHARE_DIR=/shares/internal/VIDEO
# Use to override what happens when iconv fails to parse a file name.
# The default uShare behaviour is to not add the entry in the media list
# This option overrides that behaviour and adds the non-iconv'ed string into
# the media list, with the assumption that the renderer will be able to
# handle it. Devices like Noxon 2 have no problem with strings being passed
# as is. (Umlauts for all!)
#
# Options are TRUE/YES/1 for override and anything else for default behaviour
USHARE_OVERRIDE_ICONV_ERR=
# Enable Web interface (yes/no)
ENABLE_WEB=
# Enable Telnet control interface (yes/no)
ENABLE_TELNET=no
# Use XboX 360 compatibility mode (yes/no)
ENABLE_XBOX=yes
# Use DLNA profile (yes/no)
# This is needed for PlayStation3 to work (among other devices)
ENABLE_DLNA=no
And here's my /etc/init.d/ushare.sh file used for starting and stopping the process. Call /etc/init.d/ushare.sh start to kick things off.
[gordon]$ more /etc/init.d/ushare.sh
#!/bin/sh -e
### BEGIN INIT INFO
# Required-Start: $local_fs $syslog
# Required-Stop:
# Default-Start: 2 3 4 5
# Default-Stop: 0 1 6
# Short-Description: start and stop ushare
# Description:
### END INIT INFO
PATH=/usr/local/sbin:/usr/local/bin:/sbin:/bin:/usr/sbin:/usr/bin
DAEMON=/usr/local/bin/ushare
NAME=ushare
DESC="uShare UPnP A/V Media Server"
PIDFILE=/var/run/ushare.pid
# Use default in /usr/local/etc/ushare.conf
CONFIGFILE=/usr/local/etc/ushare.conf
USHARE_OPTIONS=-x
# abort if no executable exists
[ -x $DAEMON ] || exit 0
# Get lsb functions
#. /lib/lsb/init-functions
#. /etc/default/rcS
[ -f /etc/default/ushare ] && . /etc/default/ushare
checkpid() {
[ -e $PIDFILE ] || touch $PIDFILE
}
check_shares() {
if [ -r "$CONFIGFILE" ]; then
. $CONFIGFILE
[ -n "$USHARE_DIR" ] && return 0
fi
return 1
}
case "$1" in
start)
echo -n "Starting $DESC: $NAME"
if ! $(check_shares); then
echo -n "No shares available ..."
# echo -n 0
else
checkpid
start-stop-daemon --start --quiet --background --oknodo \
--make-pidfile --pidfile $PIDFILE \
--exec $DAEMON -- $USHARE_OPTIONS
fi
;;
stop)
echo -n "Stopping $DESC: $NAME"
start-stop-daemon --stop --signal 2 --quiet --oknodo --pidfile $PIDFILE
;;
reload|force-reload)
echo -n "Reloading $DESC: $NAME"
start-stop-daemon --stop --signal 1 --quiet --oknodo --pidfile $PIDFILE --exec $DAEMON
;;
restart)
$0 stop
$0 start
;;
*)
N=/etc/init.d/$NAME
echo -n "Usage: $N {start|stop|restart|reload|force-reload}"
exit 1
;;
esac
exit 0
Finally, if you want ushare to start automatically on bootup, and die cleanly on shutdown then add the following softlinks in your /etc/init.d directory.
[root]$ cd /etc/init.d
[root]$ ln -s ushare.sh S36ushare
[root]$ ln -s ushare.sh K64ushare
[root]$ ls -al *ushare*
lrwxrwxrwx 1 root root 9 Aug 29 17:05 K36ushare -> ushare.sh
lrwxrwxrwx 1 root root 9 Aug 29 17:05 S36ushare -> ushare.sh
-rwxr-xr-x 1 root root 1615 Aug 29 17:00 ushare.sh
And the final thing I had to do was add a "broadcast" route to the mybook's routing path. without this, the XBox could browse the files, but not play any of them. I admit I've only added this on the command line for the moment so it my need re-added if the mybook is ever rebooted.
[root]$ route add -net 239.0.0.0 netmask 255.0.0.0 eth0
That's it! It worked. Now browsing files on the XBox prompted me to connect to XBox Live to download a media update (containing the DivX codecs an such) and following that I was watching MOVIES I RIPPED FROM MY OWN DVDS on my lovely 1080p LCD TV. Any upscaling is unnoticable (to me).
I guess the next step is to, um, "find" some hi-def ripped films and try those to check the wireless bandwidth and the MyBook disk controller are up to the task.
Saturday, August 30, 2008
Tuesday, August 5, 2008
Cross Compilation 03
I was right. It was too good to be true. I mounted the .ext2 file created by buildroot.
> sudo mkdir /mnt/mybook
> sudo mount -t ext2 -o loop rootfs-arm_nofpu.ext2 /mnt/mybook
and was able to browse around. It has all the config files and scripts under /etc (woop) but the /bin directory is completely empty (meh).
So it looks like, at the very least, I haven't built the kernel or busybox.
On the plus side, the build_arm_nofpu/staging/dir/bin did seem to contain a set of tools prefixed with "arm-linux-" so I wrote a very simple Hello World c file and compiled it using arm-linux-gcc. (I added the staging_dir/bin directory to the PATH).
> arm-linux-gcc -o helloarm helloworld.c
Then scp'd the resulting executable onto the mybook. Then from the mybook, I was able to run helloarm!
So technically I've carried out my first cross-compilation. But this was the most basic file possible and I guess I could have achieved it using gcc directly on the command line just as easily (although I've linked to uClibc I think. Which is nice.)
Try again tomorrow to configure the kernel and busybox; cross-compile those, hopefully all from within the buildroot run.
Monday, August 4, 2008
Cross Compilation 2
Ha! I almost typed cross copulation there! That would have been funny?
Right this was too easy. After a few trip ups
Anyway, finding out how to mount this image as a filesystem is something I need to research so this seems as good a palce to stop for the night as any. I'm sure it's simple but it's a new step to start tomorrow. Oooh, the anticipation!
I bet it's empty.
Right this was too easy. After a few trip ups
- Needed to install flex, bison and patch (via apt-get of course)
- ubuntu links /bin/sh to the dash shell which was causing a syntax error: bad fd number(?) so I changed the softlink to use bash instead of dash.
- Copied all the directories under buildroot-patches/packages and buildroot-patches/patches into buildroot/package
- I was getting the following error message: "arm-linux-uclibc-ld: ERROR:/home/gordon/extract/buildroot/build_arn_nofpu/lib/gcc/arm-linux-uclibc/3.4.2/libgcc.a(_dvmd_lnx.o)uses hardware FP, whereas ld-uClibc-0.9.28.so uses software FP" so altered one of the FPU settings under make menuconfig to not use a hardware FPU. (It looked like my original config file from last night had been overwritten as some other settings were lost). A new call to make seemed to revuild everything.
Anyway, finding out how to mount this image as a filesystem is something I need to research so this seems as good a palce to stop for the night as any. I'm sure it's simple but it's a new step to start tomorrow. Oooh, the anticipation!
I bet it's empty.
Sunday, August 3, 2008
Cross Compilation 1
Cross? I was bloody livid.
This blogging stuff is difficult to keep up with isn't it? One of the things I've been working on and not posting about is trying to carry out cross compilation for my Western digital myBook. So I'd like to be able to, for example, download the sourcecode for lightppd, compile it on a faster processer and then install on the MyBook. Now it may be possible to just download the code and try
make CROSS-COMPILE=arm
or something, but it seems the way to do things is to download buildroot and create an entire rootfs which matches that on the MyBook. Confused? I know I am.
I've attempted this twice already and achieved nothing. So I'm trying again and documenting my progress this time. This time I have identified the GPL code provided by Western Digital (as they seem to be obliged to do under the GPL) This includes the copy of buildroot they used to create the MyBook disk image, the linux header files they used and all the packages they used, including their busybox setup. They also include some of the necesary config files, but not all, and I think this is where the 'magic' happens and where I'm likely to continue cursing and swearing for the next few months.
So, progress so far.
- Buy a new laptop. This isn't strictly necessary but I found a bargain. Acer Aspire 5630 with 2GB RAM, Core 2 Duo T5500 for £299.
- Install VMWare server, free from vmware.
- Download ubuntu server 8.04
- With ubuntu running, ensure we have the latest versions of gcc and binutils and such.
- Download the Western Digital myBook GPL Source Code
Friday, May 9, 2008
You Say To-ma-to
I run a hacked Western Digital MyBook World Edition. It runs SSHD and with port forwarding of port 22 enabled on my router, I am able to login and access the 500Gb of storage from work.
Unfortunately this has meant opening port 22 on the router to the outside world and I was finding logs like this on the mybook recently
(If anyone wants to go visit 220.227.218.21, be my guest)
This is typical of a brute force, automated scripting attack on sshd; repeated attempts to login using a dictionary of usernames and passwords. The trick to stopping it is to recognise multiple incoming packets from the same source. A solution is described here:
Diary of a Geek
Unfortunately the solution requires iptables, the linux firewall mechanism, which needs to be compiled into the kernel. The mybook needs to be small and lightweight so does not have iptables compiled in.
However my router does. It runs Tomato which lets you do all kinds of nice linux/network related things. It's linux on a router, including iptables. Setup is via a very slick GUI, but the linux command line is there when you need it.
At first I had problems using the recent match as described in Andrew Pollock's solution as it didn't seem to be available in the Tomato setup. However a quick browse round the installation found the module was available, just not loaded. I then found that everything I needed to do (loading modules, adding new iptables rules) could be done from the Administration->Scripts section of the Tomato GUI
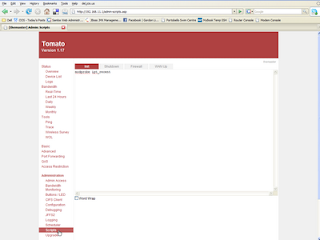 Figure 1. Init commands
Commands added to the Administration->Scripts->Init section are run when the router is booted up. I added
modprobe ipt_recent
to load the recent match module. Surprisingly easy. Rebooted and the previously missing module was now loaded. (use lsmod to see which modules are loaded)
 Figure 2. Firewall commands
Little more complicated. I think I understand the basics of iptables now, but like quantum mechanics, anyone who claims they understand it all is lying. Here's what I added:
iptables -N wanrecent
iptables -A wanrecent -p tcp -d anya --dport 22 -m state --state NEW -m recent --name SSH_LIMIT --rsource --set
iptables -A wanrecent -p tcp -d anya --dport 22 -m state --state NEW -m recent --name SSH_LIMIT --rsource --update --seconds 60 --hitcount 4 -j LOG --log-prefix "SSH LIMIT"
iptables -A wanrecent -p tcp -d anya --dport 22 -m state --state NEW -m recent --name SSH_LIMIT --rsource --update --seconds 60 --hitcount 4 -j DROP
iptables -I wanin 1 -j wanrecent
Line 1 creates a new user table called wanrecent. this just means I can keep all this custom stuff in a single place.
Line 2 initialises a match which which keeps track of incoming NEW packets on port 22 (ssh) in a list called SSH_LIMIT.
Line 3... let's skip that as it does exactly the same as line 4 but creates a log entry in syslog instead of dropping incoming packets.
Line 4 checks if a 4th NEW packet destined for port 22 from the same source arrives, and if so simply DROPs the packet. That's the trick which is going to stop our scrip-kiddies from just firing request after request after request.
Line 5 just adds the new custom table to the existing wanin table. The wanin table contains the port forwarding rules so by inserting wan recent at position 1 it is guaranteed to execute before the forwarding. Ta-dah!
The biggest difference between what's actually happening here and in Andrew's suggestion is that wanin is part of the FORWARD table in my setup as opposed to the INPUT table. This is because the INPUT table is used when packets are destined for "this" host, the machine where iptables is running. In my case, due to port forwarding, the packets are routed through the FORWARD table.
Reboot the router it all just worked! I am hpapy.
Unfortunately this has meant opening port 22 on the router to the outside world and I was finding logs like this on the mybook recently
May 9 15:53:04 anya auth.info /usr/sbin/sshd[15612]: Failed password for root from 220.227.218.21 port 39837 ssh2
May 9 15:53:07 anya auth.info /usr/sbin/sshd[15614]: Invalid user fluffy from 220.227.218.21
May 9 15:53:07 anya auth.err /usr/sbin/sshd[15614]: error: Could not get shadow information for NOUSER
May 9 15:53:07 anya auth.info /usr/sbin/sshd[15614]: Failed password for invalid user fluffy from 220.227.218.21 port 40167 ssh2
May 9 15:53:09 anya auth.info /usr/sbin/sshd[15616]: Invalid user admin from 220.227.218.21
May 9 15:53:09 anya auth.err /usr/sbin/sshd[15616]: error: Could not get shadow information for NOUSER
May 9 15:53:09 anya auth.info /usr/sbin/sshd[15616]: Failed password for invalid user admin from 220.227.218.21 port 40408 ssh2
(If anyone wants to go visit 220.227.218.21, be my guest)
This is typical of a brute force, automated scripting attack on sshd; repeated attempts to login using a dictionary of usernames and passwords. The trick to stopping it is to recognise multiple incoming packets from the same source. A solution is described here:
Diary of a Geek
Unfortunately the solution requires iptables, the linux firewall mechanism, which needs to be compiled into the kernel. The mybook needs to be small and lightweight so does not have iptables compiled in.
However my router does. It runs Tomato which lets you do all kinds of nice linux/network related things. It's linux on a router, including iptables. Setup is via a very slick GUI, but the linux command line is there when you need it.
At first I had problems using the recent match as described in Andrew Pollock's solution as it didn't seem to be available in the Tomato setup. However a quick browse round the installation found the module was available, just not loaded. I then found that everything I needed to do (loading modules, adding new iptables rules) could be done from the Administration->Scripts section of the Tomato GUI
 Figure 1. Init commands
Commands added to the Administration->Scripts->Init section are run when the router is booted up. I added
modprobe ipt_recent
to load the recent match module. Surprisingly easy. Rebooted and the previously missing module was now loaded. (use lsmod to see which modules are loaded)
 Figure 2. Firewall commands
iptables -N wanrecent
iptables -A wanrecent -p tcp -d anya --dport 22 -m state --state NEW -m recent --name SSH_LIMIT --rsource --set
iptables -A wanrecent -p tcp -d anya --dport 22 -m state --state NEW -m recent --name SSH_LIMIT --rsource --update --seconds 60 --hitcount 4 -j LOG --log-prefix "SSH LIMIT"
iptables -A wanrecent -p tcp -d anya --dport 22 -m state --state NEW -m recent --name SSH_LIMIT --rsource --update --seconds 60 --hitcount 4 -j DROP
iptables -I wanin 1 -j wanrecent
Line 1 creates a new user table called wanrecent. this just means I can keep all this custom stuff in a single place.
Line 2 initialises a match which which keeps track of incoming NEW packets on port 22 (ssh) in a list called SSH_LIMIT.
Line 3... let's skip that as it does exactly the same as line 4 but creates a log entry in syslog instead of dropping incoming packets.
Line 4 checks if a 4th NEW packet destined for port 22 from the same source arrives, and if so simply DROPs the packet. That's the trick which is going to stop our scrip-kiddies from just firing request after request after request.
Line 5 just adds the new custom table to the existing wanin table. The wanin table contains the port forwarding rules so by inserting wan recent at position 1 it is guaranteed to execute before the forwarding. Ta-dah!
The biggest difference between what's actually happening here and in Andrew's suggestion is that wanin is part of the FORWARD table in my setup as opposed to the INPUT table. This is because the INPUT table is used when packets are destined for "this" host, the machine where iptables is running. In my case, due to port forwarding, the packets are routed through the FORWARD table.
Reboot the router it all just worked! I am hpapy.
Saturday, April 26, 2008
TestCase HeadCase
I'm writing a reeeeeally simple rails application, but want to support User security; passwords, login, authentication and authorisation, that sort of thing so am using the SaltedHashLoginGenerator detailed here.
I think I need to tweak it. I don't like email addresses as usernames for example but those are minor. My big problem is Rails functional tests.
I used the Rails scaffold generator to set up a framework for my own model/view/controller and it very kindly generated a complete set of model/unit and controller/functional tests for me. Unfortunately my functional tests all failed because every method required a valid user to log in first, thanks to Salty and the use of before_filters.
The problem is described here. Lots of people trying to use the setup method of the TestCase to either login or assign a user object to the session. Unfortunately setup seems to be broken as of Rails 2.0.2. Ticket #10568 has it fixed, but I'm not sure it hasn't broken something else, and I don't yet know how to apply a changeset without waiting for 2.0.3 anyway.
Here's how I've fixed it for me. I'll just demo using one method. The original test looked like
def test_should_create_contact
assert_difference('Contact.count') do
post :create, :contact => { :firstname => "tester" }
end
assert_redirected_to contact_path(assigns(:contact))
end
I found out that the post (along with get, out, delete and head) can take an optional 3rd parameter, a hash of key/value pairs which populate the test's session object. Since SaltedHashLoginGenerator's user_controller simply checks for a key called 'user' defining a User model object we can write
def test_should_create_contact
assert_difference('Contact.count') do
post :create, { :contact => { :firstname => "tester" } }, { 'user' => User.find(1000001) }
end
assert_redirected_to contact_path(assigns(:contact))
end
This ensures that the session object access by the controller has 'user' key with a valid User object, which keeps the user_controller happy.
Note, at first I tried to alter the line, so:
post :create, :contact => { :firstname => "tester" }, 'user' => User.find(1000001)
just adding on the last parameter after a comma. This variously ended up with an empty session and/or syntax errors as I messed about with strings, symbols and braces. In the line shown, the session turned out to be empty because it though 'user' was the second entry in the params hash, which is the second argument of the post method, i.e. the one hash contained two keys, :contact and 'user'. You wouldn't believe how long that took to track down!
Saturday, February 9, 2008
Put it all together and whaddaya got!?
After faffing about a bit trying to get everything to boot up on startup, it all ended up being simpler than I expected.
First, create your configuration file for wpa_supplicant. Because I started off using the network-tool, this is /etc/wpa_supplicant/wpa_psk.conf for me.
gordon> more /etc/wpa_supplicant/wpa_psk.conf
network={
ssid="Sunnydale"
scan_ssid=1
key_mgmt=WPA-PSK
psk="xxxxxxxxxxxxx"
}
Simple and I think typical for a basic home network. Sunnydale is the domain defined on my router and xxxxxxxxxxxxx is my 13 character ascii passphrase as setup on the router. Replace these with your own values.
The next pleasant surprise, after contemplating writing an init.d script to start wpa_supplicant was that the network interface file supports wpa options! The file /etc/network/interface is read by the ifup command when the system boots, telling it which interfaces to bring up. It originally only had an entry for the loop back adapter.
gordon> more /etc/network/interfaces
# This file describes the network interfaces available on your system
# and how to activate them. For more information, see interfaces(5).
# The Netgear wg121 USB Adapter loaded via ndiswrapper
auto wlan0
iface wlan0 inet static
address 192.168.11.12
netmask 255.255.255.0
gateway 192.168.11.1
# I don't know why the next line isn't ndiswrapper but
# wpa_supplicant reports that it doesn't support WPA.
wpa-driver wext
wpa-conf /etc/wpa_supplicant/wpa_psk.conf
# The loopback network interface
auto lo
iface lo inet loopback
reboot and I'm posting this from the laptop wirelessly! Yay!
Thursday, February 7, 2008
Tearing My Hair Out (ha ha)
Right, the last post details how to get the adapter working assuming you have a working ndiswrapper.
My girlfriend bought herself a new laptop a couple of weeks ago, thereby freeing up my very old Toshiba Satellite 1800 laptop which I hadn't managed to touch since she moved in. Since I'm not actually running a Linux desktop at the moment I thought this would be ideal to try stuff out on. Unfortunately Ubuntu Gutsy Gibbon (7.10) wasn't having any of it and the installer kept freezing with a corrupted display. The Ubuntu Alternate CD was an option but I found a couple of references to fluxbuntu, an Ubuntu based distro using the fluxbox window manager. I'd used fluxbox before so thought it was worth a try. The installation failed once when the laptop switch itself off (almost as if it timed out and powersave kicked in) but worked perfectly on a second attempt if I pressed the spacebar every now and again. (Who knows?)
Once installed the first thing is to get on-line and get any patches and whatnot. While there are some new drivers (madwifi) around since I last tried this, they don't support the Broadcom chipset in my Netgear wg121 USB wireless adapter.
So the accepted solution is to use ndiswrapper, a Linux implementation of Windows' Network Driver Interface Specification (NDIS) APIs. This will load Windows drivers for your wireless adapter and allow Linux to use them. The ndiswrapper project consists of two parts,
Now! This next bit below (in red) is WHAT I DID WRONG! This is for background and what to check if you're having similar problems. Don't do this!
It looked like the ndiswrapper util came pre-built so I just cd'd into ndiswrapper-1.52/driver and build the module
gordon> cd ~/ndiswrapper-1.52/driver
gordon> make
All worked fine. This generated ndiswrapper.ko which should be copied to /lib/modules//ubuntu/misc/ndiswrapper, taking a backup of the existing one just in case.
gordon> sudo cp ndiswrapper.ko /lib/module/2.6.22-14-generic/ubuntu/misc/ndiswrapper
And then, followed the steps as described in the last post. the only difference (ha!) was that ndiswrapper wasn't on the su path so I had to run it manually from ~/ndiswrapper-1.52/utils/ndiswrapper every time.
Everything seemed to work, except where the rest of the world saw their wlan0 interface enabled, I had nothing. modprobe reported ndiswrapper module had been loaded correctly. ndiswrapper -l reported the driver and device were both present. It wasn't until I checked my ndiswrapper version that I realised what was wrong
gordon> ndiswrapper -v
module version is too old!
I eventually realised that I should have compiled the ndiswrapper utils after all, particularly the loaddriver object file, There was a Makefile in the top level of the ndiswrapper-1.52 download which I'd missed.
gordon> cd ~/ndiswrapper-1.52
gordon> sudo make uninstall
gordon> make
BANG! Screens and screens of errors. it seems that Fluxbuntu comes with the gcc compiler, binutils and even the linx kernel header, but not the libc6-dev package which includes all the useful files like stdlib.h.
Well shit.
If I was on the internet then it would be easy via apt-get, but of course what am I trying to achieve today!?
Back to the PC and manually download the libc headers from http://packages.ubuntu.com. I needed
gordon> sudo dpkg -i linux-libc-dev
gordon> sudo dpkg -i libc6
gordon> sudo dpkg libc6-dev
Aaaaand back to ~/ndiswrapper-1.52 to rebuild
gordon> cd ~/ndiswrapper-1.52
gordon> make
gordon> sudo make install
And it looks like we finally have a result! the step in the last post now work.
Sorry that was so long but it's covered a number of things including ndiswrapper gotchas, installing debian packages manually and discovering what's missing from a fluxbuntu basic install. don't get me wrong, fluxbuntu is in early stages and can' guess what setup and circumstances are going to affect everyone using their distro. Apart from these teething troubles it looks very nice otherwise. Maybe ensure a full set of build packages are n the installation CD would be nice though.
My girlfriend bought herself a new laptop a couple of weeks ago, thereby freeing up my very old Toshiba Satellite 1800 laptop which I hadn't managed to touch since she moved in. Since I'm not actually running a Linux desktop at the moment I thought this would be ideal to try stuff out on. Unfortunately Ubuntu Gutsy Gibbon (7.10) wasn't having any of it and the installer kept freezing with a corrupted display. The Ubuntu Alternate CD was an option but I found a couple of references to fluxbuntu, an Ubuntu based distro using the fluxbox window manager. I'd used fluxbox before so thought it was worth a try. The installation failed once when the laptop switch itself off (almost as if it timed out and powersave kicked in) but worked perfectly on a second attempt if I pressed the spacebar every now and again. (Who knows?)
Once installed the first thing is to get on-line and get any patches and whatnot. While there are some new drivers (madwifi) around since I last tried this, they don't support the Broadcom chipset in my Netgear wg121 USB wireless adapter.
So the accepted solution is to use ndiswrapper, a Linux implementation of Windows' Network Driver Interface Specification (NDIS) APIs. This will load Windows drivers for your wireless adapter and allow Linux to use them. The ndiswrapper project consists of two parts,
- The ndiswrapper module. This is the runtime component of the project and loads the API wrappers into your Linux system so that they're available to the Kernel. (I think)
- The ndiswrapper utils, which is a command line tool to help you configure stuff and load your windows drivers.
Now! This next bit below (in red) is WHAT I DID WRONG! This is for background and what to check if you're having similar problems. Don't do this!
It looked like the ndiswrapper util came pre-built so I just cd'd into ndiswrapper-1.52/driver and build the module
gordon> cd ~/ndiswrapper-1.52/driver
gordon> make
All worked fine. This generated ndiswrapper.ko which should be copied to /lib/modules/
gordon> sudo cp ndiswrapper.ko /lib/module/2.6.22-14-generic/ubuntu/misc/ndiswrapper
And then, followed the steps as described in the last post. the only difference (ha!) was that ndiswrapper wasn't on the su path so I had to run it manually from ~/ndiswrapper-1.52/utils/ndiswrapper every time.
Everything seemed to work, except where the rest of the world saw their wlan0 interface enabled, I had nothing. modprobe reported ndiswrapper module had been loaded correctly. ndiswrapper -l reported the driver and device were both present. It wasn't until I checked my ndiswrapper version that I realised what was wrong
gordon> ndiswrapper -v
module version is too old!
I eventually realised that I should have compiled the ndiswrapper utils after all, particularly the loaddriver object file, There was a Makefile in the top level of the ndiswrapper-1.52 download which I'd missed.
gordon> cd ~/ndiswrapper-1.52
gordon> sudo make uninstall
gordon> make
BANG! Screens and screens of errors. it seems that Fluxbuntu comes with the gcc compiler, binutils and even the linx kernel header, but not the libc6-dev package which includes all the useful files like stdlib.h.
Well shit.
If I was on the internet then it would be easy via apt-get, but of course what am I trying to achieve today!?
Back to the PC and manually download the libc headers from http://packages.ubuntu.com. I needed
- libc6-dev
- libc6
- linux-libc-dev
gordon> sudo dpkg -i linux-libc-dev
gordon> sudo dpkg -i libc6
gordon> sudo dpkg libc6-dev
Aaaaand back to ~/ndiswrapper-1.52 to rebuild
gordon> cd ~/ndiswrapper-1.52
gordon> make
gordon> sudo make install
And it looks like we finally have a result! the step in the last post now work.
Sorry that was so long but it's covered a number of things including ndiswrapper gotchas, installing debian packages manually and discovering what's missing from a fluxbuntu basic install. don't get me wrong, fluxbuntu is in early stages and can' guess what setup and circumstances are going to affect everyone using their distro. Apart from these teething troubles it looks very nice otherwise. Maybe ensure a full set of build packages are n the installation CD would be nice though.
I Have The Power!
A few days absent due to
First of all, find the Windows drivers for your adapter. In my case this is a Netgear wg121 USB adapter with V2 of its firmware installed. I already had the latest files from Netgear; WG121V200.zip. Plug in the USB stick and mount it under a directory under /media. Unzipping the file created a directory under my home area.
gordon> cd ~/WG121V200/ndis5
In this directory is the inf file describing the driver, netwg121.inf. fluxbuntu is set up to do everything using sudo rather than logging in as root. We are going to use ndiswrapper to load the Netgear Windows driver.
First unload the ndiswrapper module just in case it's already doing something else.
gordon> sudo modprobe -r ndiswrapper
Check there are no other drivers loaded by ndiswrapper.
gordon> sudo ndiswrapper -l
If anything is returned use
gordon> sudo ndiswrapper -r <driver name>
to unload anything loaded. (Technically ndiswrapper might have other Windows drivers loaded. You'll just have to use good judgement to decide whether one of those is for wireless adapter that you're not actually using and might cause a conflict with what we're trying to do)
Now load the netgear driver (or your own .inf file)
gordon> sudo ndiswrapper -i netwg121.inf
installing netwg121 ...
Excellent, check we've loaded the driver
gordon> sudo ndiswrapper -l
netwg121 : driver installed
device (0846:4210) present (alternate driver: p54usb)
Get ndiswrapper to write a modprobe conf file. this will ensure that the driver is loaded as wlan0 every time modprobe loads the ndiswrapper module.
gordon> sudo ndiswrapper -m
Now use modprobe to load the ndiswrapper module into memory. Module are like dynamic libraries which can be loaded on demand to give your Linux installation extra capabilities.
gordon> sudo modprobe -i ndiswrapper
And DING! Power and signal LEDs on the adapter are both on!
I'm not all the way there yet but this is a significant jump forward over the sweat and tears of Tuesday and complete stalemate of Wednesday. I still have to set up wpa_supplicant to handle my WPA encryption and make sure everything is reloaded automatically on rebooting. I'll cover the problems I had getting to here in the next post.
(There's weren't really tears. If Linux ever really makes me cry then it's time to get a new hobby)
- having a life at weekends
- f%*$ing fluxbuntu, ndiswrapper, modprobe et al
First of all, find the Windows drivers for your adapter. In my case this is a Netgear wg121 USB adapter with V2 of its firmware installed. I already had the latest files from Netgear; WG121V200.zip. Plug in the USB stick and mount it under a directory under /media. Unzipping the file created a directory under my home area.
gordon> cd ~/WG121V200/ndis5
In this directory is the inf file describing the driver, netwg121.inf. fluxbuntu is set up to do everything using sudo rather than logging in as root. We are going to use ndiswrapper to load the Netgear Windows driver.
First unload the ndiswrapper module just in case it's already doing something else.
gordon> sudo modprobe -r ndiswrapper
Check there are no other drivers loaded by ndiswrapper.
gordon> sudo ndiswrapper -l
If anything is returned use
gordon> sudo ndiswrapper -r <driver name>
to unload anything loaded. (Technically ndiswrapper might have other Windows drivers loaded. You'll just have to use good judgement to decide whether one of those is for wireless adapter that you're not actually using and might cause a conflict with what we're trying to do)
Now load the netgear driver (or your own .inf file)
gordon> sudo ndiswrapper -i netwg121.inf
installing netwg121 ...
Excellent, check we've loaded the driver
gordon> sudo ndiswrapper -l
netwg121 : driver installed
device (0846:4210) present (alternate driver: p54usb)
Get ndiswrapper to write a modprobe conf file. this will ensure that the driver is loaded as wlan0 every time modprobe loads the ndiswrapper module.
gordon> sudo ndiswrapper -m
Now use modprobe to load the ndiswrapper module into memory. Module are like dynamic libraries which can be loaded on demand to give your Linux installation extra capabilities.
gordon> sudo modprobe -i ndiswrapper
And DING! Power and signal LEDs on the adapter are both on!
I'm not all the way there yet but this is a significant jump forward over the sweat and tears of Tuesday and complete stalemate of Wednesday. I still have to set up wpa_supplicant to handle my WPA encryption and make sure everything is reloaded automatically on rebooting. I'll cover the problems I had getting to here in the next post.
(There's weren't really tears. If Linux ever really makes me cry then it's time to get a new hobby)
Friday, February 1, 2008
smb.conf
Phew!
Startup script /etc/init.d/S27-shares-cleanup was calling the removeExternalShares.pl perl script. It should probably be trying to be clever and only removing shares that it finds under /shares/external that aren't listed under /proc/mounts. It's sufficient for now just to comment out the removeExternalShares line.
Startup script /etc/init.d/S27-shares-cleanup was calling the removeExternalShares.pl perl script. It should probably be trying to be clever and only removing shares that it finds under /shares/external that aren't listed under /proc/mounts. It's sufficient for now just to comment out the removeExternalShares line.
Thursday, January 31, 2008
smb.conf Ovewrites. It's not finished...
root> /etc/init.d/lighttpd.sh stop
which takes down lighttpd and the nasMaster.pl FCGI script.
Then edited /etc/init.d/network_servers.sh to disable start and stop of lighttpd at startup and shutdown.
Then manually updated /var/oxsemi/shares.inc to add a new share.
Then
root> reboot
When the machine comes back up, the file has not been overwritten. A-ha! One of the last things nasMaster.pl does before entering the CGI dispatch loop is invoke Service::Shares->createDefault() but all this does, as far as I can see is delete and recreate the [PUBLIC] share.
Service::Shares also defines a deleteAllExternal() method which would certainly hae the same effect I'm seeing, but where is it called...?
I feel like Columbo. I know who did it and now just need to badger them into making a mistake to get the proof I need.
smb.conf Overwrites
Last night.
As previously mentioned I plugged a LaCie external USB hard disk into the MBW and it appeared via hotplug. Then created a samba share for it using the Drive Managment tool in the MBW web-admin console.
But after rebooting, the external drive is gone again. I mean, how annoying is that!?
The drive management tool writes its updates to a shares.inc file which is included by the main smb.conf file. (All samba config is in the /var/oxsemi directory). On rebooting, both smb.conf and shares.inc have last update times set during boot up (or possibly shutdown? To check!). The shares.inc file has been overwritten, keeps all the shares on /shares/internal but is missing my lovely new backups share!?
Results so far
- I don't think Samba overwrites the files as a matter of course. It may alter file permissions for security when nmbd or smbd starts up but not change the contents?
- there are some "tidy up external shares" perl scripts as part of the usr/www/lib area which is where the web admin tools live. But disabling lighttpd on start up (which should prevent any .pl scripts from running) makes no difference. (Maybe it's a shutdown script as mentioned above?) Even then the script is meant to check if the mount point is listed in /etc/mtab, which it is.
Tuesday, January 29, 2008
Preparation
Some tidying up and moving things around on the MyBook World (henceforth referred to as MBW).
The MBW has a USB socket on the back for connecting external drives to, so my 250Gb LaCie is now plugged in to make it always available. This will be used for windows backups. (Currently using Cobian but getting errors when using compression... may have to try something else).
The USB drive was automatically recognised and mounted under /shares/external, but with no write permission as it was currently formatted as NTFS.
Unmount the drive, which for me appears as /dev/sdb1
root> umount /dev/sdb1
Then use fdisk to reformat the drive
root> fdisk /dev/sdb1
Command (m for help): d
Command (m for help): n
Create a single primary partition
Command (m for help): w
Then create an ext3 file system on the partition
root> /sbin/mkfs.ext3 /dev/sdb1
Reboot and the drive should be mounted under /shares/external as a writable filesystem.
Use the WD Shared Storage Manager to create a new public share called BACKUPS. The only person with write permission will be me as I'm the only PC user running the backup software.
Gotcha: I tried to use fdisk to change the partition's System ID. This was 83 (Linux) by default. I tried to make it fd (Linux raid auto) to match the MBW's internal disk. This continually failed with an illegal argument error. I eventually realised that Linux raid auto is only valid for a disk attached via a RAID controller which the internal disk must be. The USB disk, of course, isn't. Half an hour of my life I'll never get back.
Monday, January 28, 2008
A New Hope
Feel free to read if you wish, or ignore if you don't.
I spend a fair bit of spare time fiddling about with programming and Linux stuff. Taking the "if it ain't broke then you're not trying hard enough" approach to many things. Typically I get something working. Once. Then re-invent the wheel six months or a year later doing it again. I need to keep a note of what I've done, preferably somewhere I can check from anywhere, and is searchable, indexable and convenient.
And free.
So this is for me, but if a google search brings you here while you're searching for the solution to a particularly thorny problem then make yourself at home, I hope something might be of use.
Currently working on:
- A Contacts and Birthdays application written using Ruby on Rails
- Setting up a uPnP media server on a hacked Western Digital MyBook World Edition
Subscribe to:
Posts (Atom)
